on
Alphanumeric shellcode continued
Quick Note
At the time of writing this (a month ago, I’m terribly slow at posting stuff), I had received my email from OffSec and been told that I had passed my OSCE. Everything I learnt during my preperation had helped massively with the exam so I thought I would continue writing up my work to aid in anyone else who is planning to take the exam or who just wanted to be able to pwn more with x86.
Introduction:
Previously, in this post I was discussing alphanumeric shellcode, also referred to as venetian shellcode. At the time of writing, I had only learnt the concept about manually encoding shellcode into alphanumeric (ascii friendly) hex values, which are used to ADD/SUB values together resulting in the required 4 byte value which is pushed onto the stack. If this isn’t making sense, please read the previous post to catch up as this post will be written with the assumption that you already know what alphanumeric shellcode is and why we want to use it.
We have our Alphanumeric shellcode, what happens now?
So now we have our shellcode, encoding in alphanumeric values. Each 4 byte chunk of shellcode is converted into a sequence of ADD/SUB instructions, which creates out target 4 byte chunk in the EAX register, finally pushing it onto the stack as if it were injected normally. For clarity, we will use the example of an encoded 4 byte chunk from the previous post:
[*] Encoding chunk: 1 -> 9080cd0b

\x25\x4a\x4d\x4e\x55 => and eax, 0x554e4d4a
\x25\x35\x32\x31\x2a => and eax, 0x2a313235
\x05\x06\x67\x40\x50 => add eax, 0x50406706
\x05\x05\x66\x40\x40 => add eax, 0x40406605
\x50                 => push eax

[*] Encoding chunk: 4 -> 69622f68

\x25\x4a\x4d\x4e\x55 => and eax, 0x554e4d4a
\x25\x35\x32\x31\x2a => and eax, 0x2a313235
\x05\x34\x26\x32\x34 => add eax, 0x34322634
\x05\x34\x26\x32\x34 => add eax, 0x34322634
\x05\x33\x16\x31\x34 => add eax, 0x34311633
\x2d\x33\x33\x33\x33 => sub eax, 0x33333333
\x50                 => push eax
The above two examples are encoding the 4 byte chunks ‘0x9080cd0b’ and ‘0x69622f68’. As we can see one of the encoders has used 2 ADD instructions and the second has used 3 ADD instructions and 1 SUB instruction to get the final result.
So now we have to figure out where are decoded shellcode is being pushed and use our control of execution to make sure we write to a safe place. An ideal location to write our shellcode is somewhere we can continue exection by NOPing into it, jumping to or similar. There are a few things we have to think about before figuring out a good location:
- overwriting our own payload
- overwriting important code within the process
- decoding and writing to a legal destination
If possible, I try to decode and write my shellcode directly underneath the encoded payload (with enough space between). This allows me to simply fill my buffer in the following manner:
- encoded shellcode
- NOPs (‘0x47’ == ‘G’)
- target decode location (start as low (high address) as possible)
If we have 1000 bytes of space in our target buffer, this would be relatively easy to encode a payload into alphanumeric shellcode, and decode it below the encoded shellcode. With our injected NOP’s the decoding process would complete and execution would slide into our decoded shellcode - continuing without errors.
Knowing we can write below is all well and good, until we realise our ESP is actually pointing somewhere random which we have no chance of getting too. Luckily, we can re-align our stack pointer with alphanumeric friendly instructions.
Re-aligning our stack pointer
There are a tonne of online resources that truly explain stack re-alignment, so I won’t go into detail too much. However I will explain it from an alphanumeric friendly point of view and why we need it for our example above.
Let’s say for arguments sake our current ESP is 0x41414141, and the bottom of our controllable buffer is 0x61616161. If we overflow, decode and push our target shellcode onto ESP, there is no way we will end up continuing execution into our decoded shellcode on the stack (due to the massive difference). I guess if every instruction was a NOP it would technically work, but who we kidding… For this case, we want to essentially calculate a new value for ESP which will ultimately align our stack pointer to somewhere we know we can easily get too.
In order to re-align our ESP, we want to do the following:
- Move our ESP value into a register we can use easily. Let’s use EAX.
- Calculate the difference between our current ESP and our target ESP (bottom of the buffer)
- ADD/SUB alphanumeric friendly values to create the target ESP value in EAX
- Overwrite our ESP with our new EAX
That in itself may seem a little confusing, but in actual practice - the trickiest bit can be generating the alphanumeric friendly values to perform the ADD/SUB instructions. But once you have done it once, it’s pretty simple. For me personally, it’s more of trial and error until you hit that sweet spot.
The shellcode we are going to use to re-align our ESP:
push esp ; add our current ESP value onto the stack
pop eax  ; remove the value of the top of the stack into EAX
add ax, <byte diff between current ESP and target ESP> ; calculate our new target value
push eax ; add the newly created value to the top of the stack
pop esp  ; remove this off the stack into ESP (ultimately aligning it)
A shellcode visualisation to this would be:
54                ;  push esp
58                ;  pop eax
66 05 4c 0b       ;  add offset (this needs to be alphanumeric friendly)
50                ;  push eax
5c                ;  pop esp
It is important to remember that when adding the offsets to reach our target esp, that the offset values have to be alphanumeric, as well as not contain any null bytes. For example, if you had the following (unrealistic) offset of 0xFEFEFEFE, you would need to break this into a number of smaller values and perfom the addition multiple times to reach the target value. This isn’t necessarily a bad thing, just keep in mind the overflow size and not waste more bytes than you can afford.
Once complete, we want to place this re-align shellcode infront of our encoded shellcode. This would give us the following sections of our payload:
- junk
- EIP overwrite (assuming EIP is our target)
- stack re-alignment (in this case, we are at ESP and we JMP from EIP)
- encoded shellcode
- NOPs (‘0x47’ == ‘G’)
- target decode location (start as low as possible)
To further aid in understanding the process of re-aligning the stack pointer, decoding our encoded shellcode, pushing our decoded shellcode onto the stack and finally continuing into our final payload can be seen across the following images. Apologies in advance if they confuse you further, I am not visually talented!
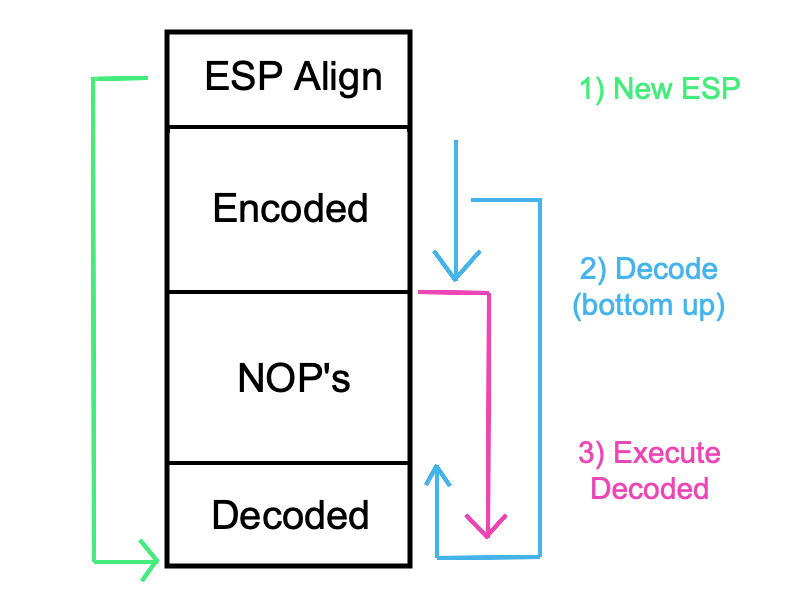
Once executed, stepping through the process will give you a good idea of what exactly is happening. When debugging my shellcode I tend to throw a tonne of ‘0xcc’ values in there to trigger a software interrupt - however in this example, that value would be encoded and would likely end up just breaking the program (out of the ASCII range). Instead, when you have gotten to the point of seeing where you code lands (etc), drop some breakpoints in yourself and step through the process. After a couple of attempts it will become easier and you’ll sort of just get used to it (great motivation speech Gary, well done!).
During the final execution, the shellcode will be decoded to your target address and providing the instructions between the END of your ended shellcode and the target location of your decoded shellcode is all safe instructions (preferably NOP’s you control), then it will successfully continue execution and run your injected shellcode. This could be an egghunter (depending on buffer space), a reverse shell or even the wonderful calc for your PoC. Either way, if you can get around the limitation of safe characters then you can do whatever you like!
At this point, I have hopefully finished up explaining alphanumeric shellcode and how to use it within a buffer overflow payload. If I have missed any sections or something isn’t clear - please let me know and I will update where necessary!